WordPress and Shopify are the leading e-commerce platforms that you will probably encounter when nurturing an online store. WordPress plugin and Shopify-powered WordPress themes have been introduced since 2016 and the relationship between two giant systems is upgraded integrating Buy Button code from Shopify with WordPress. This connection generates opportunities for the merchants to improve the customer experience as well as their store performance. In this article, you will acknowledge how to integrate these two robust platforms to flourish sales.
Step 0: Create your website with WordPress
WordPress dashboard
A number of steps must be taken to start a website on WordPress. Firstly, you need to set a domain name for your business and if you have struggled in picking up a domain, there are some domain name generators available to help. Next, you need to select a website host that can be considered as the house of your website. Once domain name, web host and WordPress are ready, it is time to integrate with Shopify.
Step 1: Set up Shopify store
If you already have a Shopify account, you can skip this step. Otherwise, access the Shopify homepage, insert your email address and start a free 14-day trial period.

Insert email to start a trial period
Enter your password, store name and click the “Create your store” button. Some questions about your store will show up and all you need to do is to choose your answers and then click “Next”.
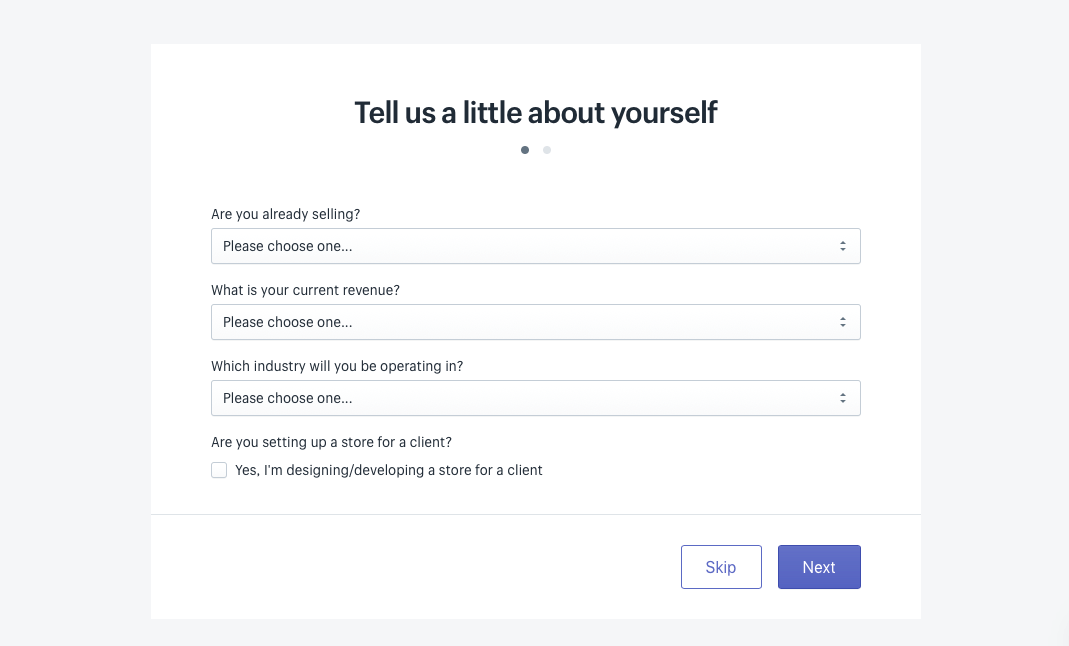
Answer some questions about your store
After that, you need to fill in your name, contact number, address, and website address and click “Enter my store” at the bottom of the page to be redirected to your store’s homepage.
Step 2: Set up Payment gateways and Shipping method
Go to “Settings” and click on “Payment Provider” to receive payment from customers. The default gateway will be PayPal payments with PayPal Express Checkout.
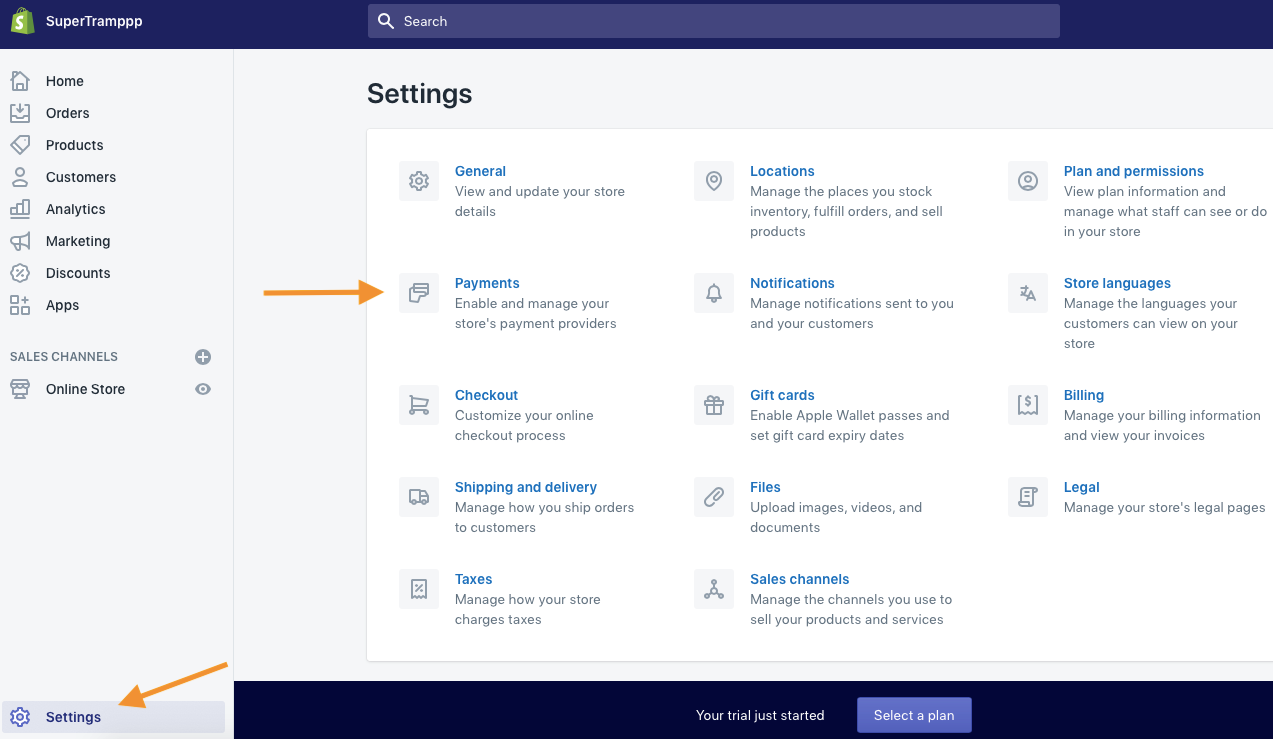
Set up Payment Gateways to accept payment from customers
If the email address of your PayPal account is the same as the email address of your Shopify store, payment acceptance will be generated instantly. Otherwise, an email with full instructions to set up a PayPal payment will be sent directly. Additionally, you can also accept other payment forms such as BitPay, GoCoin or credit card or one of the alternative payment gateways.
Regarding Shipping, click on “Setting” again, go to “Shipping and Delivery”. The default address is the address you insert in step 1, if you want to adjust, click on “Change shipping origin” to set zones and rates for shipping.
Step 3: Choose Shopify Plan and add products to the store
There are 5 plans to choose from: Shopify Lite, Shopify Basic, Shopify, Advanced Shopify and Shopify Plus. The price of three popular Shopify Plans are as following:
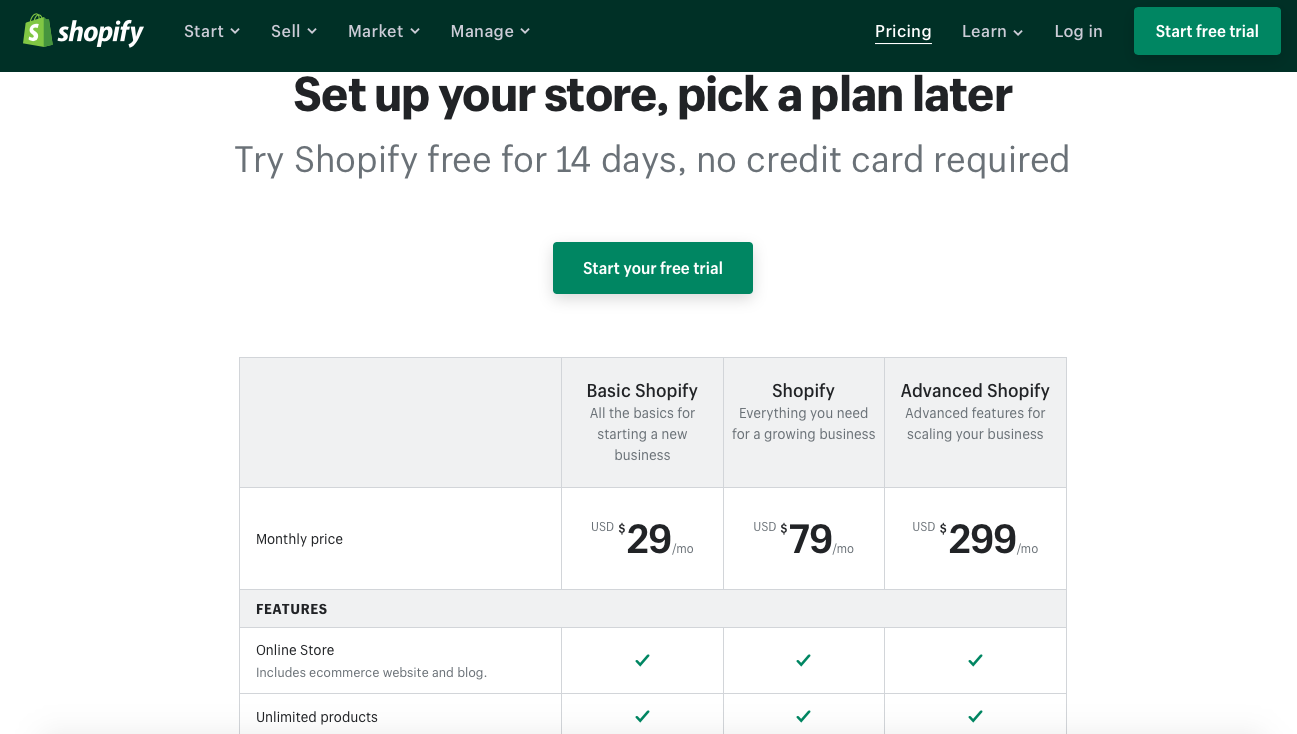
Cost of popular Shopify Plans
These three plans offer the fundamental functions needed for an online store.
Shopify Lite does not help you to start a website but you can integrate with WordPress, which will save a lot of money. On the other hand, Shopify Plus is usually used for large-scale enterprises and the price is customized.
Next, you will add products to your Shopify account, click on “Products”, then “Add product” and fill in title, price, product description, photos, etc.; you can categorize them in collection or group for more efficient management; once finished, click on “Save” button.
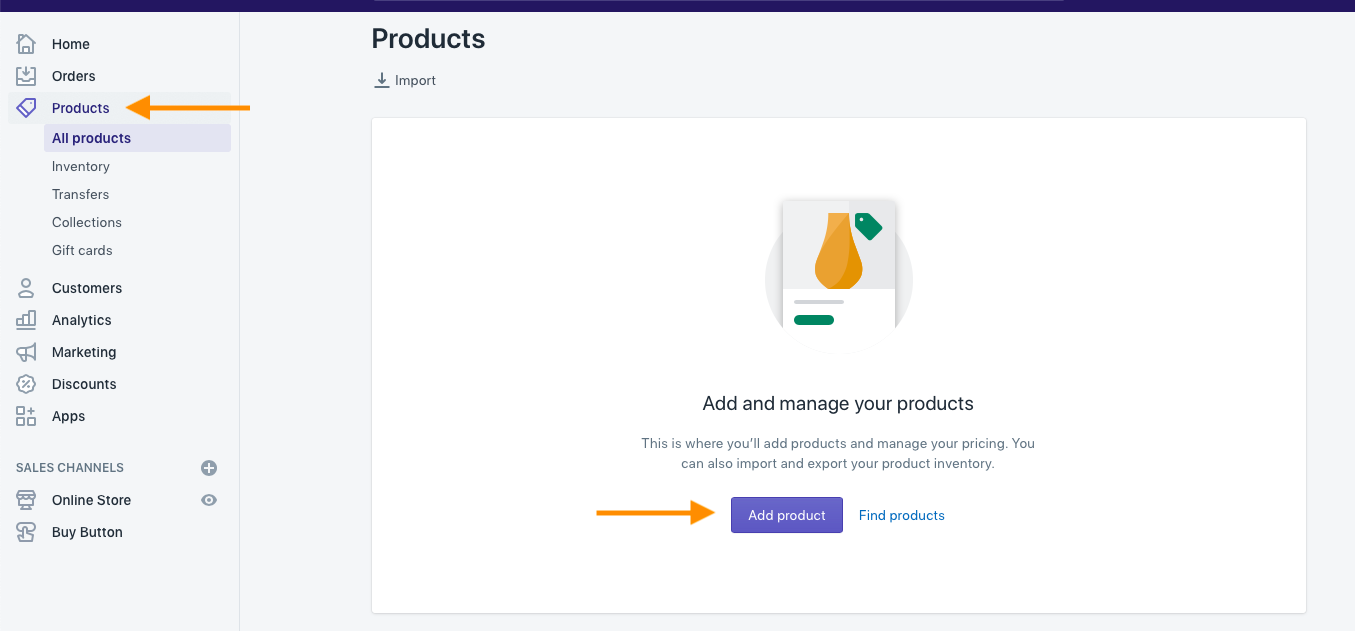
Add products to your Shopify store
Step 4: Activate Shopify Buy Button
You are very close to WordPress integration, however, prior to this, you must activate the “Buy Button”. “Buy Button” will embed your Shopify products across eCommerce platforms, links to Shopify checkout and enables you to sell products on other platforms including WordPress. Go to “Setting”, click on “Sales channels” and then “Add sales channel”, there will be a list of sales channels popup, but you must find “Buy Button”, install and then click on “Create Buy Button”.
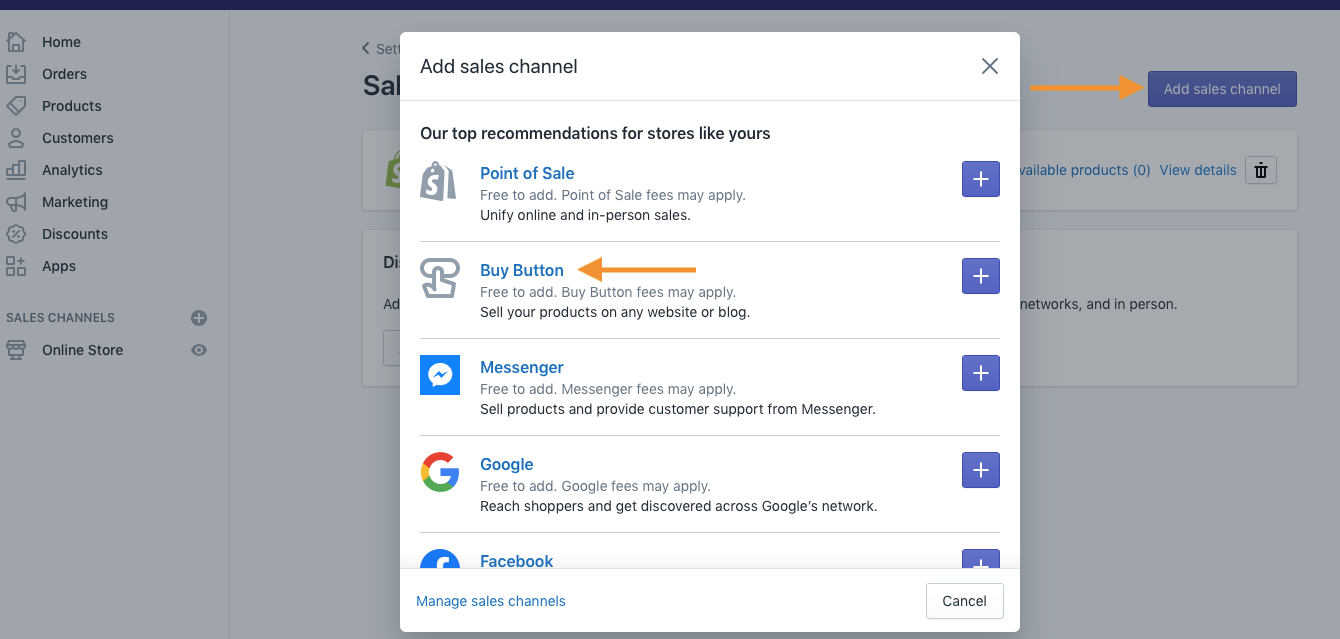
Add “Buy Button”
Then, select the products that you want to generate the buy button.
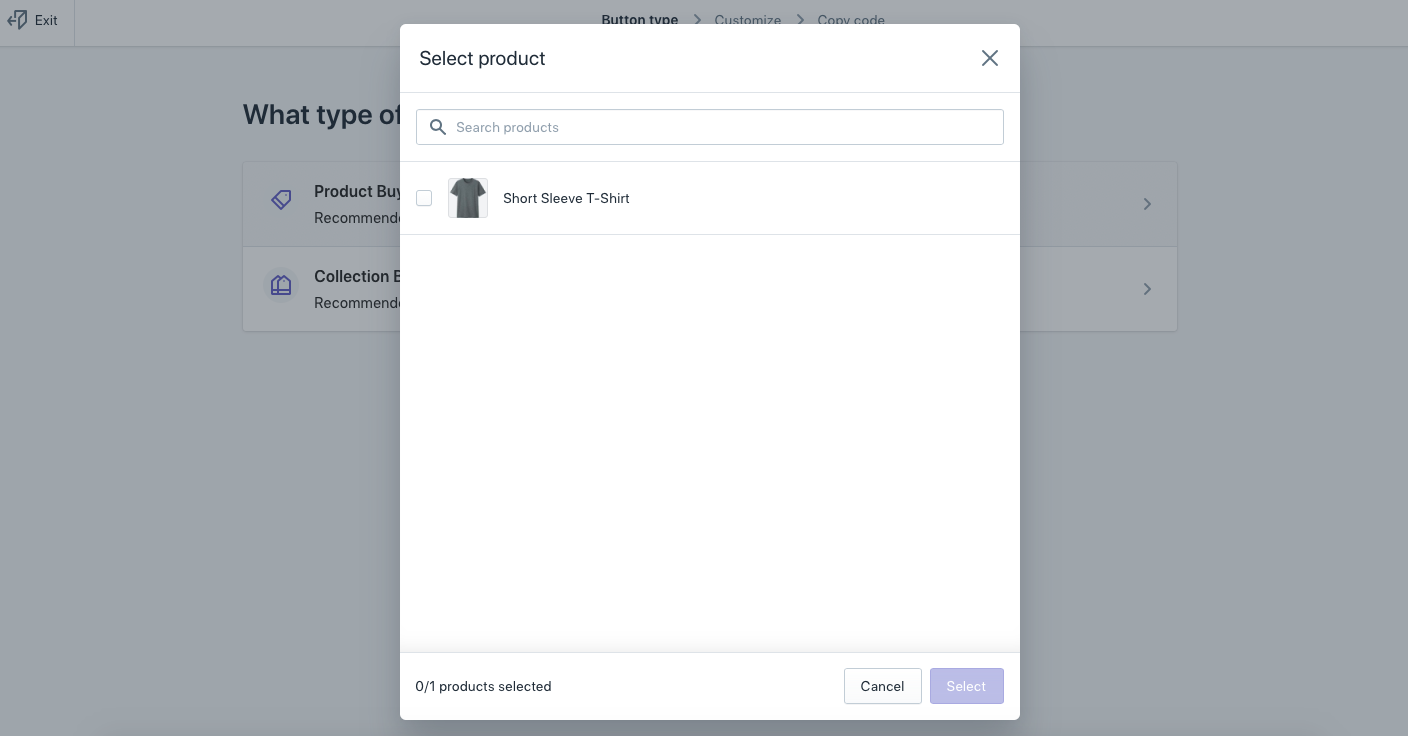
Select product to generate code
Next, you must click the “Generate code” button to show the code, copy that and save to paste on WordPress. Note: you can adjust the color of the button and text, customize the template before generating code, and the code is the must-have material for the integration process.
Step 5: Integrate with WordPress
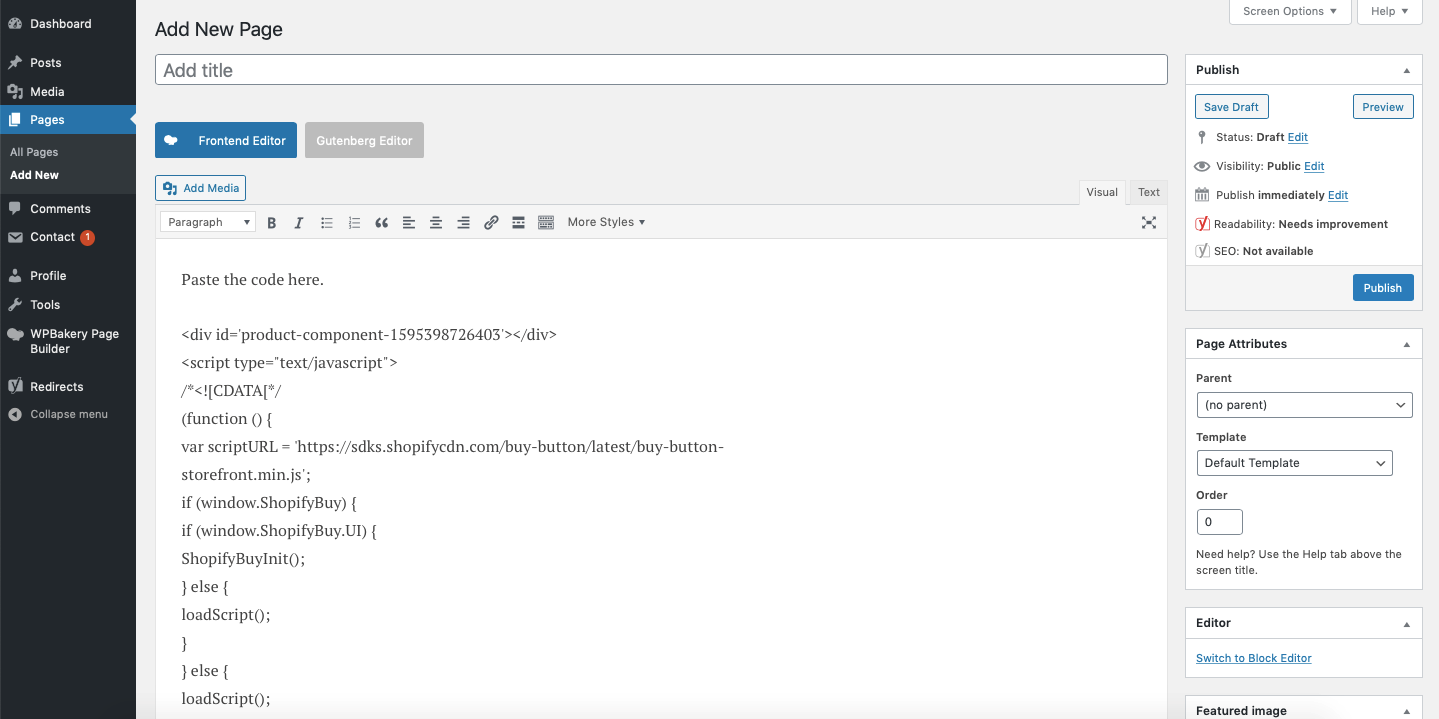
Integrate Shopify Products with WordPress
Previous steps might be slightly sophisticated however this one is absolutely not. Open your WordPress and paste the above code at any location that you wish the Buy Button to appear. This code can be placed on blog posts and WordPress sidebar also. Buy Button will be shown on the WordPress website as a shortcut to your Shopify store and the audience can straightly visit your store for product details just with one click. And now, everything is ready to build your e-commerce legend!
Shopify is a standalone e-commerce platform that beginners and savvies can launch their business. With the above guidelines, we hope that you can quickly integrate your Shopify with WordPress and promote your sales speed.
