Have you ever browsed an online store and found it extremely tidy and convenient with many collections in the navigation menu? You can create such groups on Shopify too, with very simple steps below.
In general, collections will organize your products into groups so that customers find it easier to look for what they want. You can create some collections such as clothes for women/ men/ children, items on sale, or items for special holidays.

There are two types of collections on Shopify: automated collections and manual collections. Based on your demand and the store size, you can decide what type is more suitable for your online store.
Automated Collections
As the name suggests, automated collections will automatically include products that meet the requirements you’ve set. When you add a product into your store and the product matches those requirements, it will be added automatically to the collection.
The greatest benefit of automated collections is time-saving, especially when you have a lot of items and you update the inventory regularly. However, it’s also a little bit annoying when you want to remove a particular product from the collections. In that case, you need to change the collection's conditions or edit the product details so that the product won’t match the conditions anymore.
You can create a maximum of 5,000 automated collections, and the number of selection conditions could be up to 60. If your collection has 60+ conditions, you can keep using it, or edit/ delete some conditions; but it’s impossible to add conditions if it reaches the limit.
To create an automated collection, you need to follow these steps:
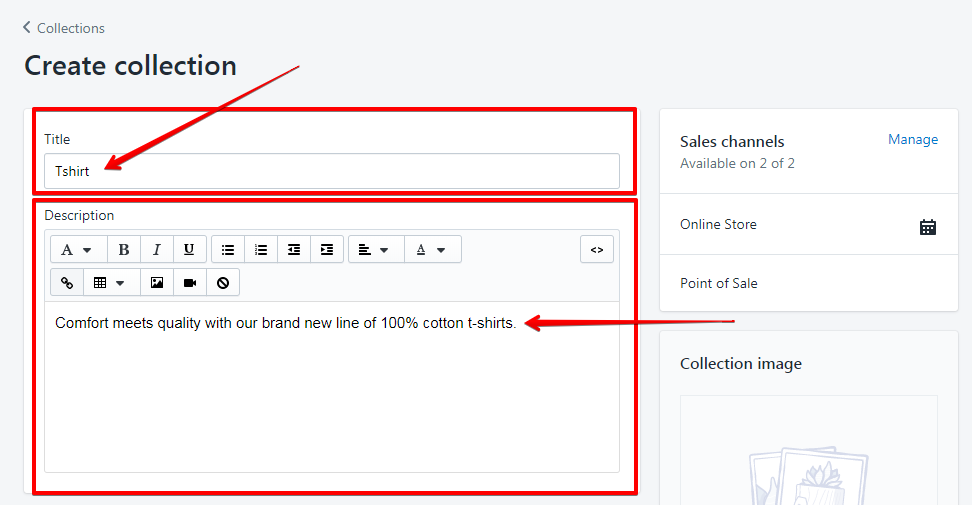
Step 1: From the Shopify Admin, choose “Products” > “Collections” > “Create Collection”. From here, enter a title and fill in the description. The description should include keywords for SEO purposes.
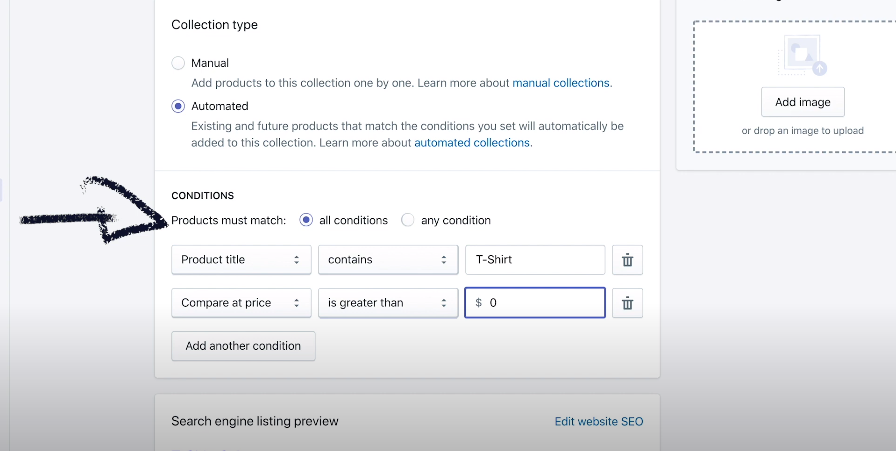
Step 2: Choose “Automated” as the collection type.
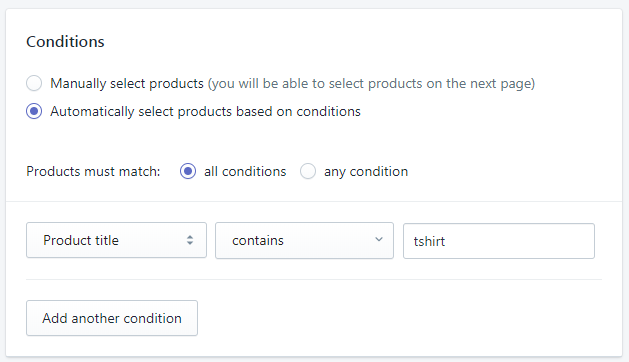
Step 3: Insert conditions for your collection.
For example, you want to create a collection named “T-shirt Sales”, which means that the word “T-shirt” should be in the title. To do that, choose “Product title” in the first dropdown menu, choose “contains” in the next menu, and type “T-shirt” in the text field.
Besides, you also need to add the conditions “on-sale”. To do that, select “Compare at price” in the first dropdown menu, then select “is greater than”, and type “0” in the text field.
Finally, choose whether you want products to match all conditions or any conditions by clicking on the option.
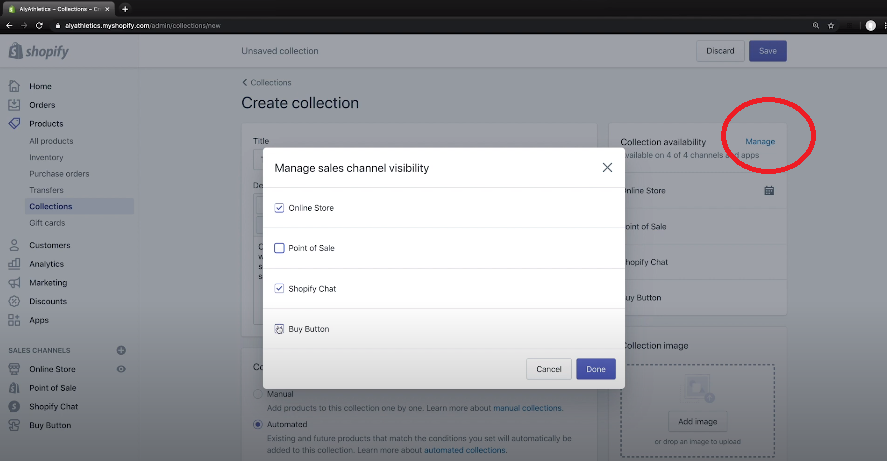
Step 4: Click on the “Manage” to decide whether you want the collection to be visible, then deselect the checkboxes for channels you want to exclude. To link the collection in the navigation menu, select the “Online Store” box.
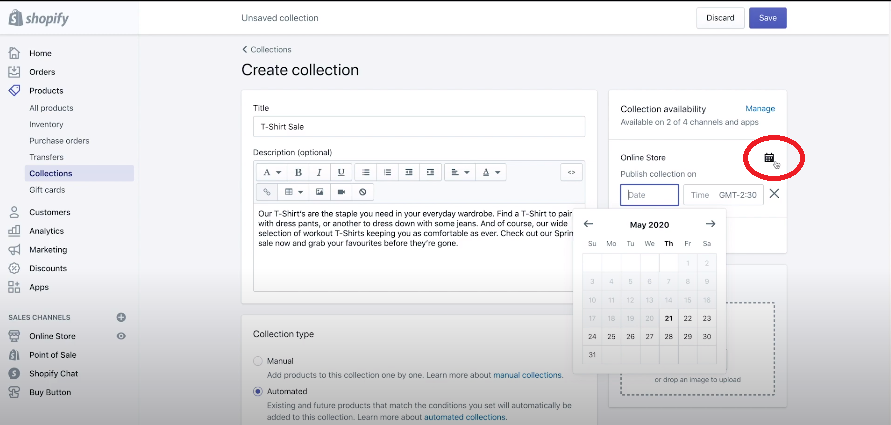
Step 5: You can also set the specific date for the collection to be published by clicking on the calendar icon and selecting the date. Remember that you can only add a collection into the navigation bar once it’s published.
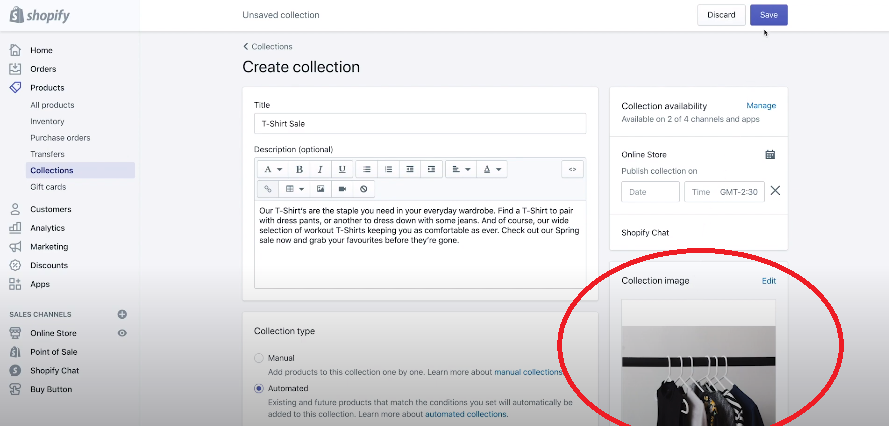
Step 6: To add images that represent the collection, pay attention to the “Collection Image” section and choose “Upload Image”. If you skip this step, Shopify will set the first product’s image to represent the whole collection.
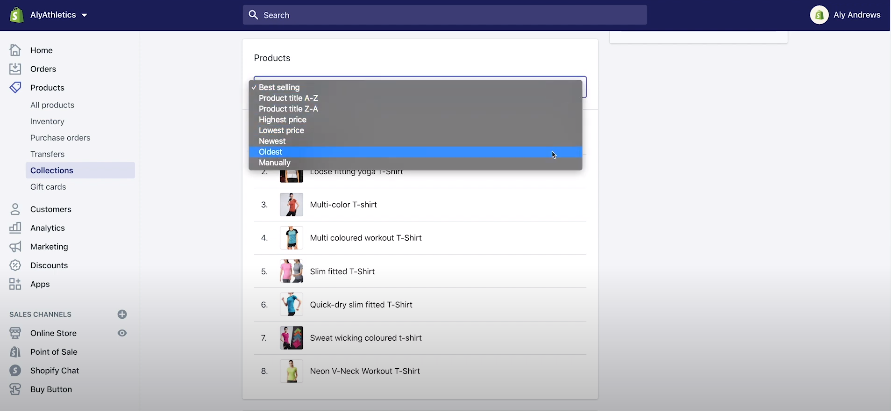
Step 7: Click “Save”. There will be a “Products” section to check every product that matches the conditions you’ve set. If nothing shows up, you should check the conditions for spelling mistakes or other errors. You can also sort the products by choosing an option from the dropdown menu.
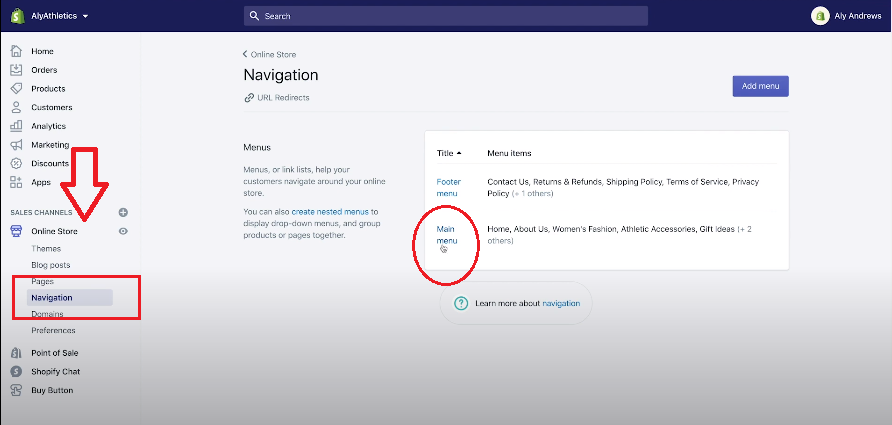
Step 8: To add the collection to the navigation bar, click “Online Store” > “Navigation” > “Main Menu”.
Scroll down and choose “Add Menu Item”. Enter the collection’s name, and in the link field, choose “Collections” and find the collection you’ve created. Then click “Add”.
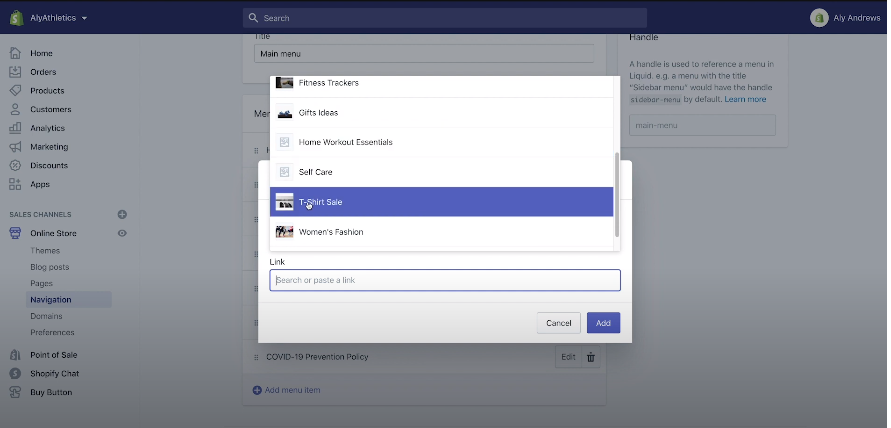
Step 9: Click “Save” to finish the whole process.
Manual Collections
Unlike automated collections, manual collections ask you to choose individually every product. Therefore, the number of products won’t change unless you specifically remove or add new products into the collections.
Even though there is more work to do, manual collections are a good choice for businessmen who have just started their business. Manual collections are super easy to set up, and they give you complete control over what products should exist in the collections. If the number of your items hasn’t reached 50 or your inventory doesn’t change very often, then manual collections should be your priority.
To create a manual collection, you need to follow these steps:
Step 1: From the Shopify Admin, choose “Products” > “Collections” > “Create Collection”. From here, enter a title and fill in the description. The description should include keywords for SEO purposes.
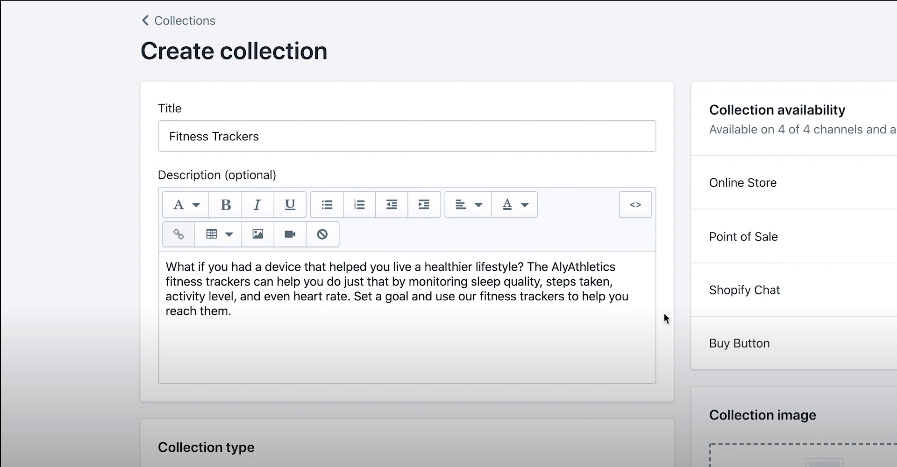
Step 2: Choose “Manual” as the collection type.
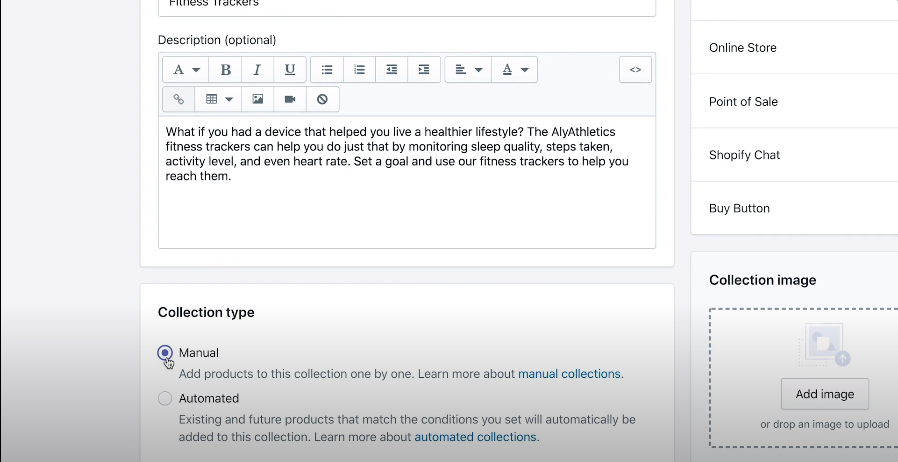
To make the collection visible, set its publish date, or add images that represent the collection, do the same as steps 4, 5, 6 of the automated collections.
Step 3: Click “Save”. Here you will see a “Products” section.
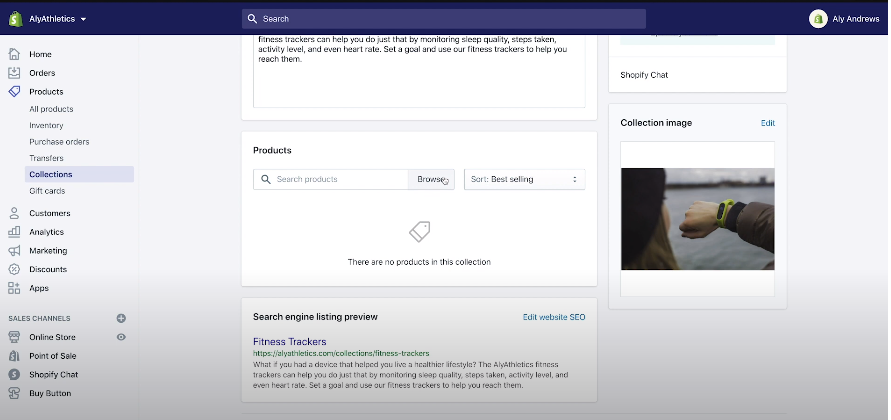
Step 4: To add products to the collection, choose “Browse” and you will see your inventory. Select items by clicking on their checkboxes. Click “Add” to finish and arrange the products by choosing an option from the “Sort” dropdown menu.
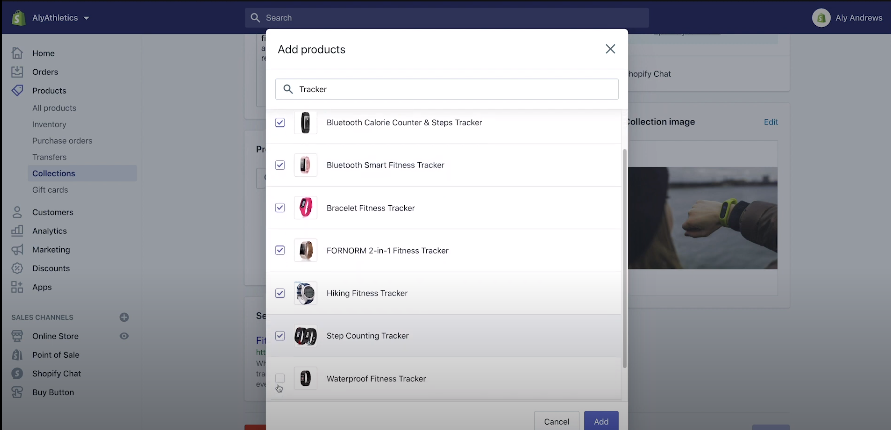
To link the new collection to the navigation bar, do the same as step 8 of the automated collections.
Step 5: Click “Save” to finish the whole process.
Now you’ve known ways to create product collections on Shopify. For those who might be interested, we also provide some tips to manage inventory when doing business on Shopify.


