Adding products to Shopify store is an indispensable part to launch your Shopify store as soon as possible. Therefore, this article will show you the detailed guideline for adding products to the Shopify store in 7 steps as well as you can easily implement them in a minute.
Why choose Shopify?

1. Quick & easy to set up & use
Shopify provides an easy way to quickly launch an online store without the complexity of infrastructure and the associated expenditures that can be incurred with self-hosted platforms such as Magento. The admin interface is clean, user-friendly, and intuitive because all the features are logically structured. On the Shopify website, You can also find extensive documentation and video tutorials on the Shopify site. All you really need is a selling item.
2. No tech worries
A basic Shopify store may be launched without any technical knowledge because Shopify handles all software and hosting. This makes it simpler to get started, Shopify’s hosting is probably faster and more secure than you could achieve on your own, and it can easily handle any traffic spikes you might experience. Additionally, Shopify also takes care of all software updates. So you can focus all your efforts on selling and not worry about technical issues.
3. Secure & reliable
If you have an Ecommerce store, you will have to deal with impatient consumers and sensitive customer data, including credit card information. This means your site needs to be fast, secure, and always online. The reliability that a hosted solution offers is one of its main benefits. Your business and shopping cart will always be accessible thanks to Shopify’s server maintenance and updates, ensuring that pages load swiftly.
4. 24/7 customer support
Shopify is big on customer support. They are available 24 hours a day, 7 days a week, and the response time is fairly fast, meaning your business is never on its own. You can get in touch via phone, email, or web chat. In addition, there are a number of community forums, extensive documentation in the Shopify Help Centre plus a range of advanced Shopify University guides.
5. SEO & Marketing tools
It’s all well and good having a beautiful online shop but if the number of visitors to your you’ll be pulling down the virtual shutters in no time. Another of Shopify’s big selling points is its powerful Search Engine Optimisation (SEO) tools that will help your website rank higher in search results so customers can find you. You also have access to advanced analytics to tell you where your customers are coming from so you can tailor your marketing accordingly. You may wish to recruit the help of an SEO company to help you.
Especially, Shopify has launched Shopify Editions, which is the biggest POS system updated from Winter’23 which is considered a solution to assist brands of all sizes to consolidate their business’s tech stack in creating higher conversion rates with the variety of services available. You can find out here!
5. Mobile friendly
Currently, the number of mobile visits to websites is higher than desktop, it’s essential, not optional, to have a mobile-optimized site. Luckily, Shopify knows this. All of Shopify’s themes are mobile responsive and the platform includes a free built-in mobile commerce shopping cart, meaning your store looks great on all devices and your customers can shop freely wherever they are.
How to add Products to Shopify: 7 Guideline Steps
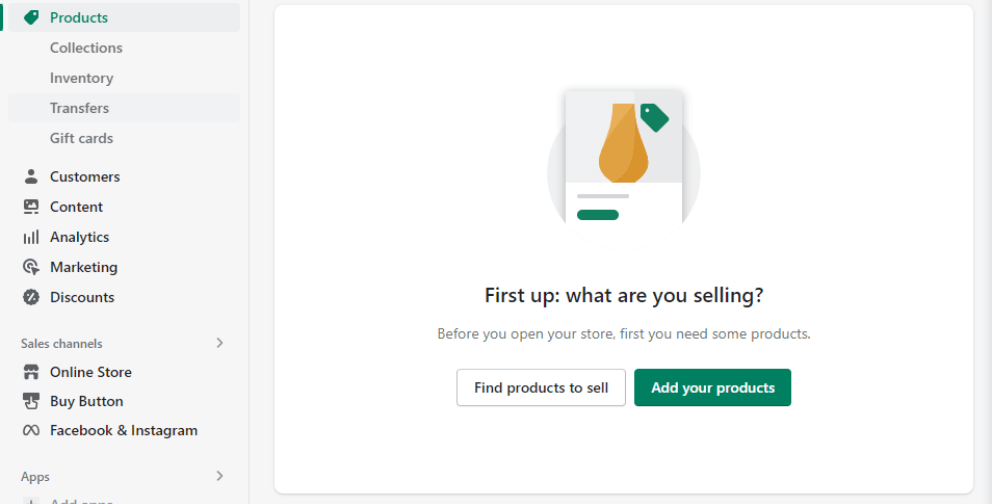
STEP 1: Log in to your account
In the first step, enter the Shopify account information and your Shopify store domain. In the Dashboard, click on “ Add your products” to start adding products to Shopify.
If you are still confused about choosing Which Shopify items to sell, you will decide speedily via Trending products to sell online in 2023
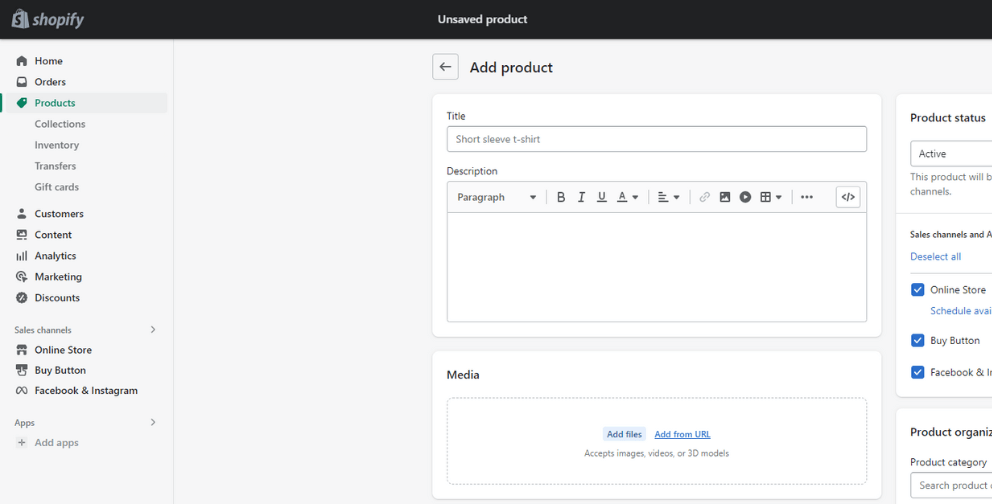
STEP 2: Write the product Details
Product details are one of the most vital factors to impress your customer firstly when they access your store. Hence, the product Title and Description must be well-display and obvious.
In particular, the title of your product is one of the first things customers will see when they search and browse through your store. The product title should contain 3 key features including:
-
Be short, and clear
-
Demonstrate the right offer to customers
-
Be engaging enough to capture the customer’s attention
Similarly, the description of the product is also a vital factor to describe and sell your product effectively. To write an interesting description, you need to pay attention to 5 features below:
-
Knowing your customers: you should make a clear customer persona by researching carefully their demographies.
-
Display what sets you apart: Show the customer your USP( unique selling points) in your product description to attract customers
-
Anticipate customer intentions and questions: Apart from thinking about customer offers, you are also focused on customers’ curiosity, worry, or unsafe feelings when they purchase online
-
Make your descriptions easy to read: Help your customers easily understand your products by writing descriptions in short, easy-to-read paragraphs with subheadings, bullet points, and bolded text.
-
Help customers see the solutions in your products: Utilize high-quality photos that show off your product. Another way you can use to write your description that lists the materials used in production.
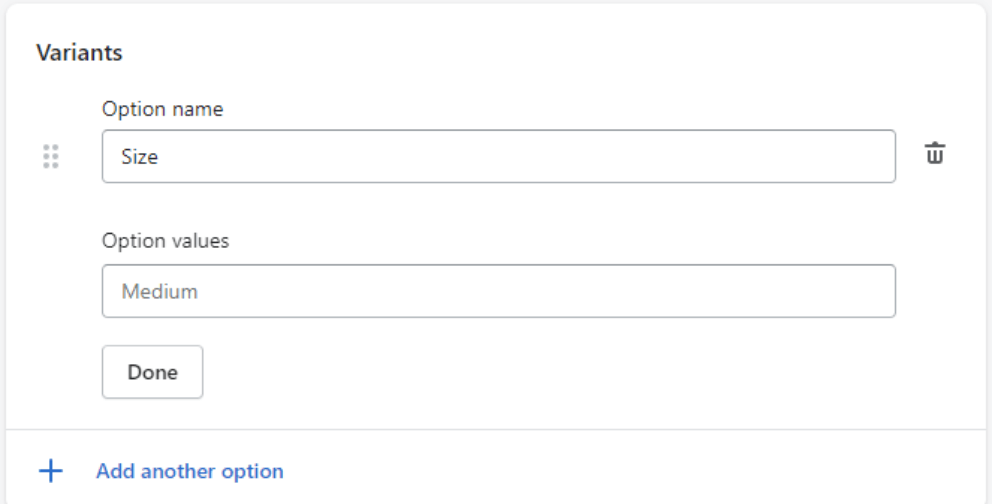
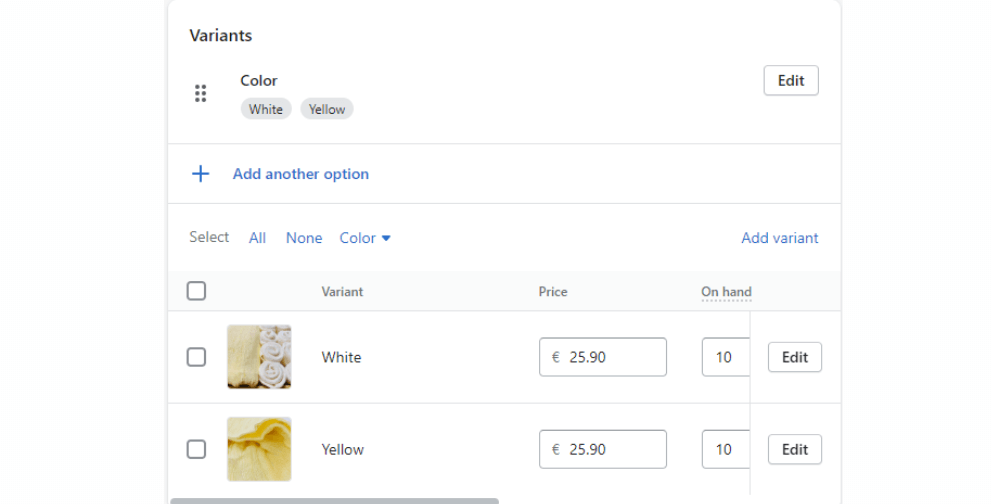
Finally, scroll down the variants and pick suitable options for your product such as size, color,...
STEP 3: Add the images for each product
In the media of the product page, you can upload any visual media like photos, video, or 3D models to display your product’s richer details. These are 4 keynotes when uploading your media:
-
Your product photos should be high-quality and able to show your products in the best light possible.
-
Ensuring all your product photos are the same aspect ratio (like the ratio between the width and height). This gives a much more polished and professional look to your website.
-
You don’t need an expensive camera to take amazing product photos while most modern smartphones can do it! Plus, you can use free editing tools to make them look even better.
-
After uploading an image, you can click on the image to perform some basic edits. For example, you can crop and resize it. If someone cannot see the photo, you can add the Alt Text for accessibility so that they understand what is in the photo.
STEP 4: Create a collection on Shopify
Adding a collection to your Shopify store has lots of advantages. It not only helps you to structure your website but also upgrades the customer experience. There are two types of collections: manual collections and automated collections.
Store owners prefer the automated type, as Shopify will automatically add inventory into their collections based on the conditions: Some Shopify templates will allow you to add the collection’s image. If you don’t select a collection picture, the image of your collection’s first product will be used.
STEP 5: Adjust other Shopify Products Setting
Here are 3 additional settings that you should pay attention to complete adding products to your Shopify store:
-
Pricing: Remember to select and set up reasonable prices based on your brand positioning. And you can also think about Discounts to increase customer purchasing decisions.
-
Shipping: You should complete setting the shipping method for your customers. This must be set up before you receive the first order. Depending on your business type, you can limit the number of available shipping options.
-
Product Reviews: You should add a customer review feature to your products with the Product Reviews app, which will make the customer to interact with your store more and generate more sales.
STEP 6: Optimize Search Engine
SEO will determine the number of customers navigating to your store site. There are 3 important tips that we want to recommend for you to upload products on Shopify more successfully.
-
Using Google Analytics or Google Search Console to know what your target customers are searching for. Then, make a list of high-volume keywords.
-
Insert the selected keywords into the names of your products, internal links, and image names.
-
In the Shopify marketplace, find suitable Shopify SEO
STEP 7: Publish Products and Check out the Store
Having a quick review of all the information of new items added before clicking the “Save Product” button to activate your Shopify product visibility.
The “ View on your website’’ option helps you to see the preview of your product so that you can perform product updates if there are any problems. You can edit the products by returning to the first step.
Conclusion
Here is a detailed guide including 7 steps on how to add products to Shopify that we want to share with you via this article. Although this is a simple stage, it is quite time-consuming. Hence, you need to be careful when implementing these steps to save your effort.
If you are confused about finding online solutions for your business. Don’t hesitate to contact us as we are always available to support you 24/7 with over 9 years of experience in Shopify development.


